


Vertica Integration with Microsoft SQL Server Reporting Services: Connection Guide
About Vertica Connection Guides
Vertica connection guides provide basic instructions for connecting a third-party partner product to Vertica. Connection guides are based on our testing with specific versions of Vertica and the partner product.
SQL Server Business Intelligence Overview
SQL Server Business Intelligence is a suite of tools for creating BI applications on your SQL Server deployment. SQL Server Data Tools (SSDT) for Visual Studio (VS) is a part of the SQL Server Business Intelligence platform that enables the functionality to create SQL Server Analysis Services (SSAS), SQL Server Integration Services (SSIS), or SQL Server Reporting Services (SSRS) projects within Visual Studio. Installing SSDT enables the SSAS, SSIS, and SSRS templates in Visual Studio:
- SQL Server Analysis Services (SSAS)—Business intelligence using either multidimensional (MOLAP) or tabular, relational (ROLAP) modeling.
- SQL Server Integration Services (SSIS)—Data migration, workflows, and ETL.
-
SQL Server Reporting Services (SSRS)—Report generation.
SQL Server Reporting Services (SSRS) Overview
SQL Server Reporting Services (SSRS) is a platform for building enterprise-level query and reporting applications. SSRS is available as a part of SQL Server Data Tools (SSDT) for Visual Studio (VS).
Vertica and SQL Server Reporting Services: Latest Versions Tested
This document provides guidance using the software listed as follows:
| Software | Version |
|---|---|
| Partner Products |
|
| Partner Product Platform |
Microsoft Windows Server 2016 |
| Vertica Client |
Vertica Client Package 11.0.0 |
| Vertica Server |
Vertica Server 11.0.0 |
Note In addition to the versions specified in the table, we successfully tested the integration of Microsoft SQL Server 2019 Community Edition on Windows Server 2019 using the Vertica ODBC driver 11.0.0. The results are similar to what is documented in this connection guide.
Installing SQL Server Reporting Services (SSRS)
To install SQL Server Reporting Services (SSRS)
-
Download and install SQL Server 2016.
Follow the installation instructions in the Microsoft documentation.
- Download and install SQL Server Data Tools (SSDT) for Visual Studio 2015.
- Download Visual Studio if not installed by SSDT.
Check the Visual Studio 2015 System Requirements.
Follow the instructions for Installing Visual Studio 2015.
Installing the Vertica Client Drivers
SQL Server Reporting Services (SSRS) can use ADO.NET or ODBC to connect to Vertica.
To download the drivers:
- Navigate to the Client Drivers page on the Vertica website.
- Download the driver package for Windows.
-
Start the installer and select the following options:
- ADO.NET Provider
- ODBC Driver
- Visual Studio Plug-in
- Microsoft Connectivity Pack
- vsql Client (Vertica recommends installing vsql client, but it's optional)
Connecting to Vertica Using ADO.NET or ODBC
Follow the instructions in the following topics to create a connection to Vertica from SSRS:
Connecting to Vertica using ADO.NET
- Open Visual Studio and create a new SQL Server Reporting Services (SSRS) project.
To create a new project, select File > New > Project.
-
The New Project window opens. Select Report Server Project Wizard or Report Server Project.
Report Server Project Wizard - SSRS starts a wizard that creates the report server project, including a data source connection, dataset, and a report.
Report Server Project - SSRS creates a project, but you must create the data source connection, dataset, and the report within the project.
We selected a Report Server Project in our testing.
- Click OK. The Solution Explorer displays the report project.
- Right-click Shared Data Sources and click Add New Data Source.
- On the Shared Data Source Properties page, expand the Type drop-down list. Select Vertica and click Edit.
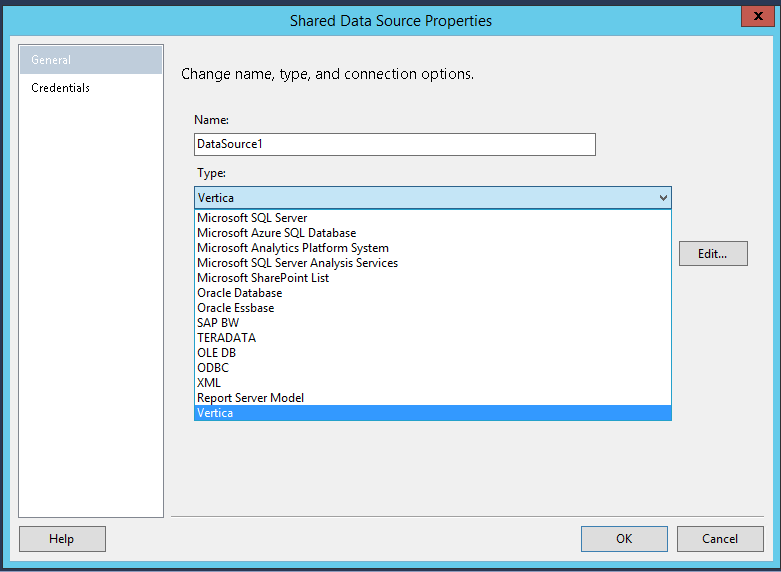
- On the Connection Properties page, enter the connection information for the Vertica database.
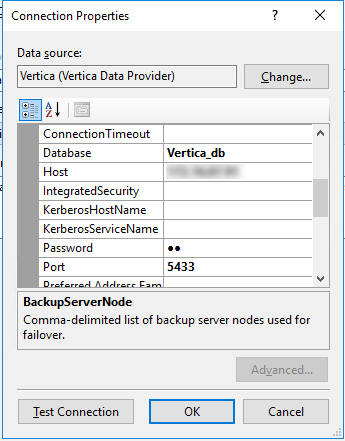
- Click Test Connection.
- Click OK.
Connecting to Vertica using ODBC
Note The Vertica Client Package installer provides both the 32- and the 64-bit ODBC drivers. However, only the 32-bit ODBC driver is visible within SSDT, because SSDT is a 32-bit application.
For ODBC connections, we recommend that you create a User DSN (not a System DSN), because a User DSN automatically uses the appropriate bitness for the connection.
If you create a System DSN, then you must create both a 32- and a 64-bit DSN with the same name.
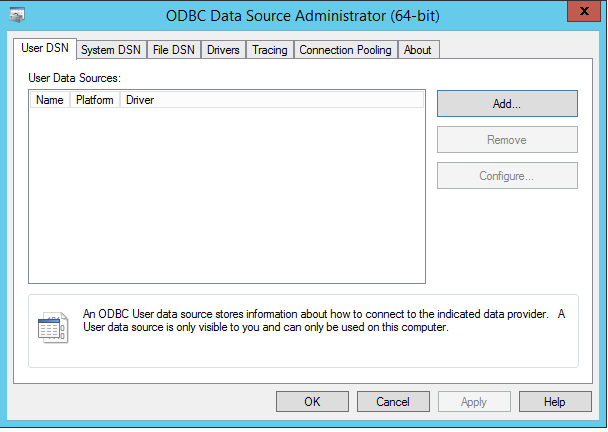
- Open the 64-bit ODBC Data Source Administrator, select the User DSN tab, and click Add to add a new User DSN (recommended).
- On the Create New Data Source page, select Vertica and click Finish.
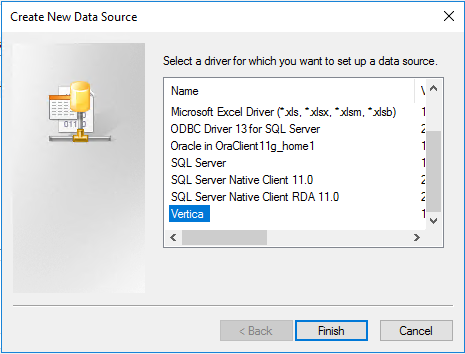
-
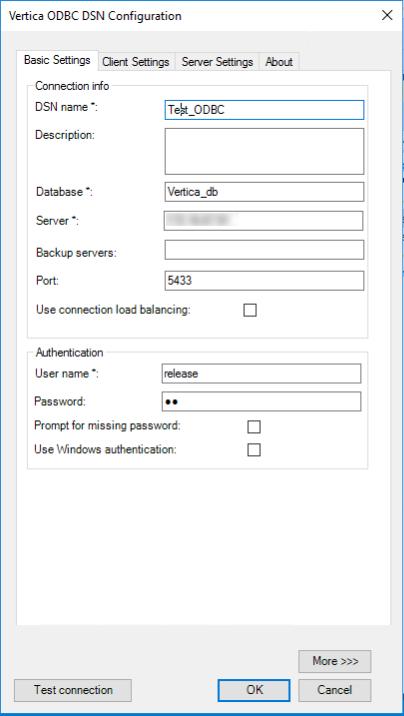
The Vertica ODBC DSN Configuration window displays.
Specify values for DSN Name, Database, Server, Port, User name, and Password.
- Click Test Connection.
- Open Visual Studio and create a new SQL Server Reporting Services (SSRS) project. To create a new project, select File > New > Project.
-
In the New Project window, select Report Server Project Wizard or Report Server Project. We selected Report Server Project in our testing.
Once a new Report Server project is created, the Solution Explorer displays the report.
- Right-click Shared Data Sources and click Add New Data Source.
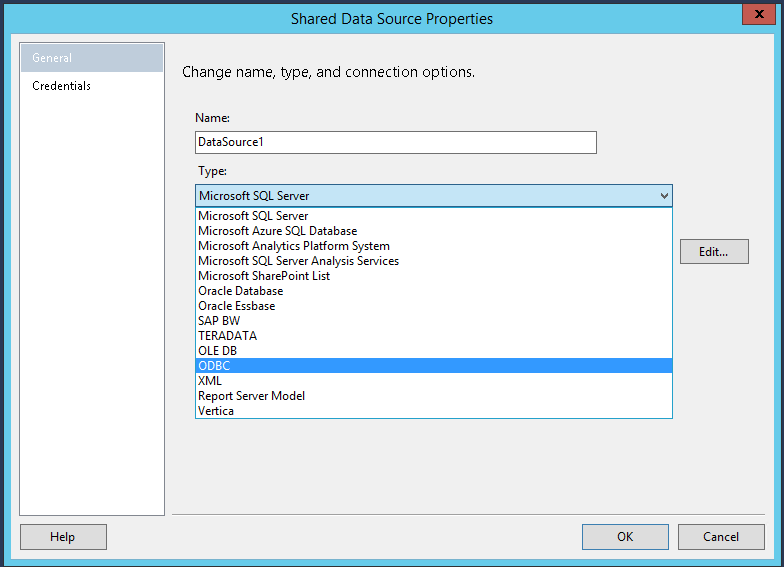
- On the Shared Data Source Properties page, expand the Type drop-down list. Select ODBC and click Edit.
- On the Connection Properties page, select the DSN you created.
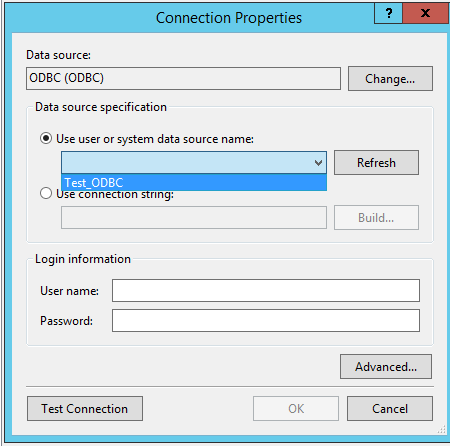
- Click Test Connection.
- Click OK and then click OK again.
Deploying and Browsing a Project
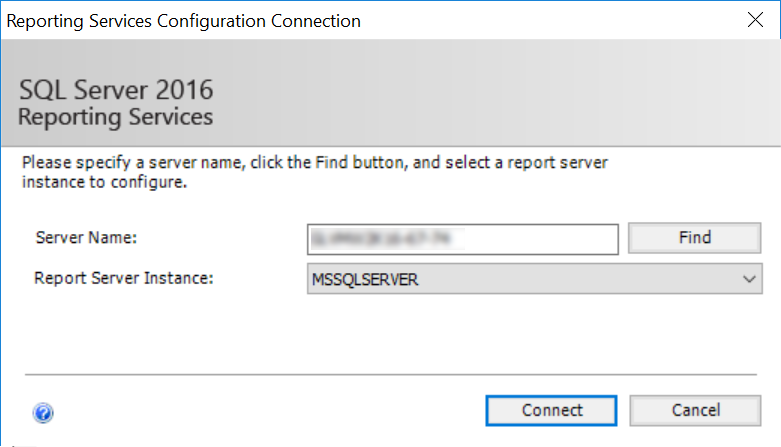
- Open the Reporting Services Configuration Manager located inside the Microsoft SQL Server 2016 folder in the Windows Start menu. The Reporting Services Configuration Connection dialog opens.
- Select
the values for Server Name and Report Server Instance, and then click Connect.
-
In the Reporting Services Configuration Manager, on the left pane, click Web Service URL .
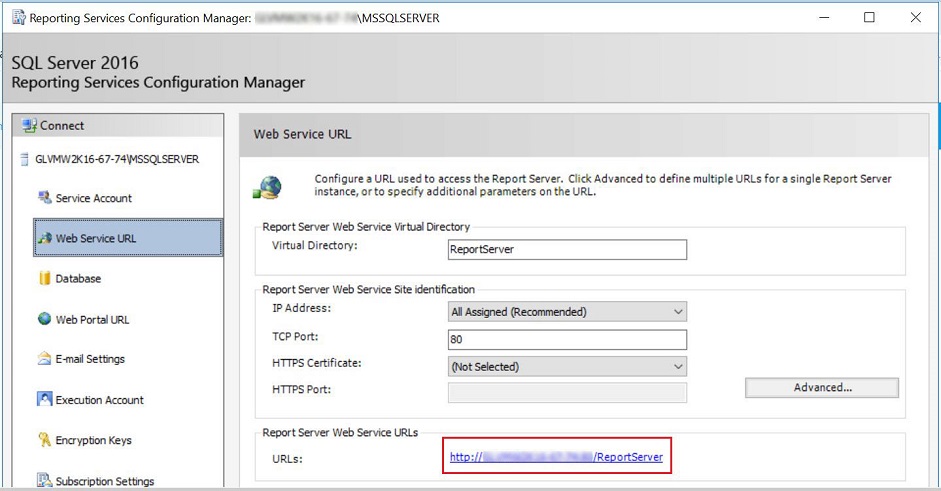
- Copy the URL that appears in the section labeled Report Server Web Service URLs.
- Switch to Visual Studio.
- Right-click the project you want to deploy and select Properties. The Property Pages window opens.
In the TargetServerURL property value, enter the server URL that you copied earlier.
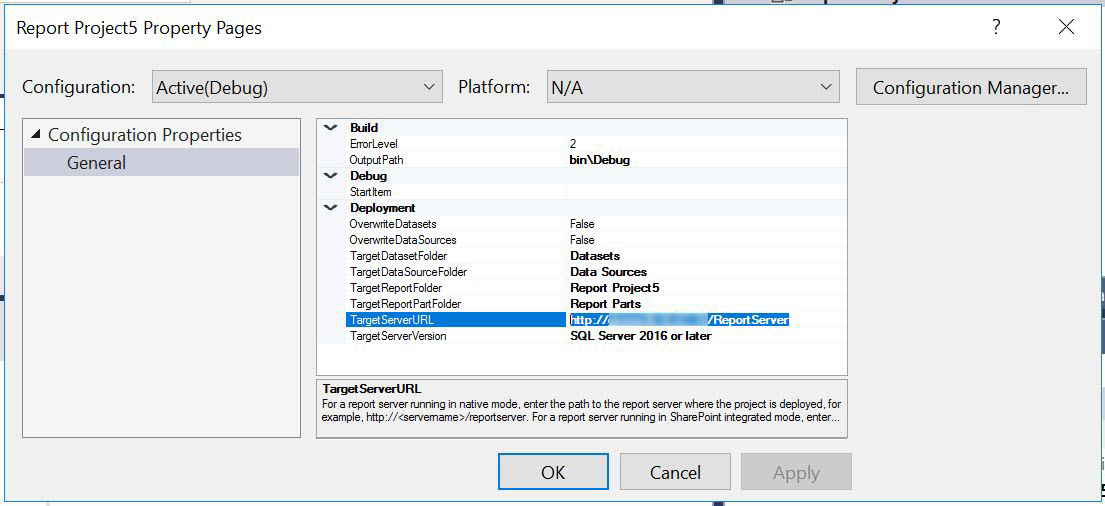
- Click OK.
- Right-click the project and select Deploy.
- Switch back to Reporting Services Configuration Manager and select Web Portal URL.
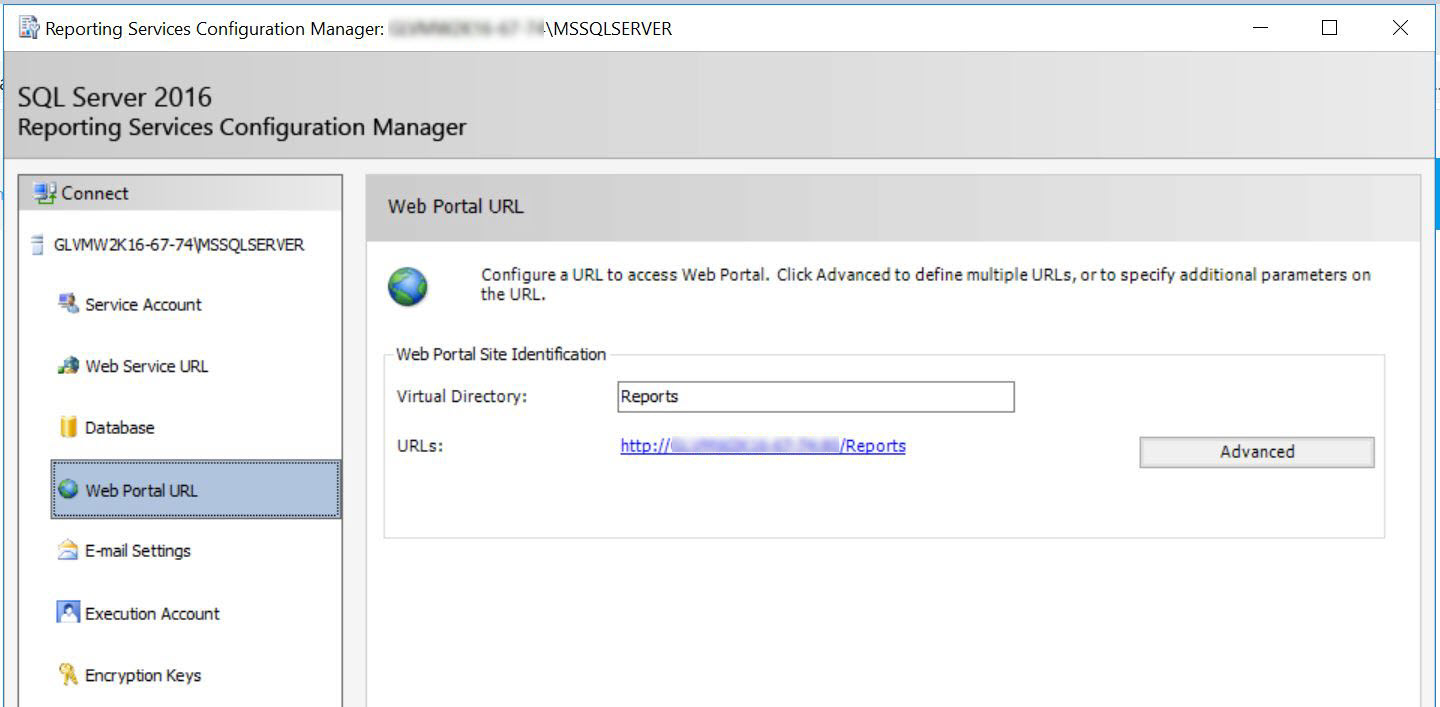
- Click the URL specified on the page.
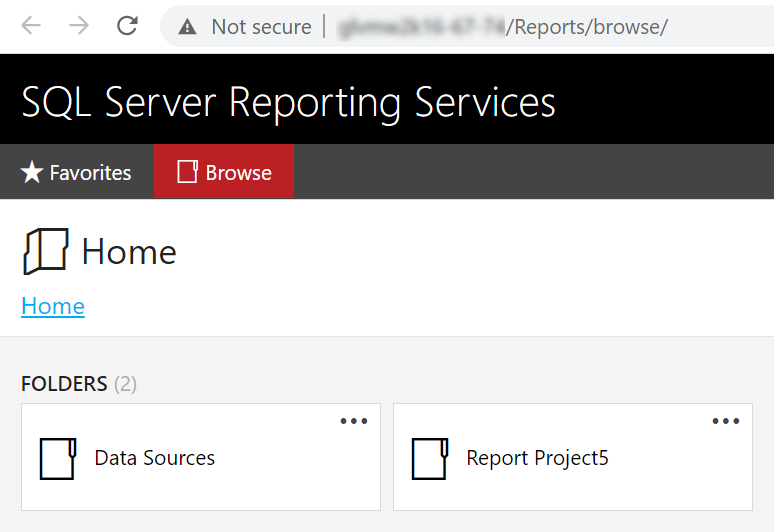
The SQL Server Reporting Services Web Portal opens in the default browser. This is the landing page for SQL Server Reporting Services. Your report project and Data Sources associated with the project will be displayed. In this example the report project that was deployed is Report Project5.
To verify the Data Source connection, click on the 3 dots in the Data Sources folder and select Manage.

In the screen that opens, click Test connection to ensure that you successfully connect to your Vertica database.
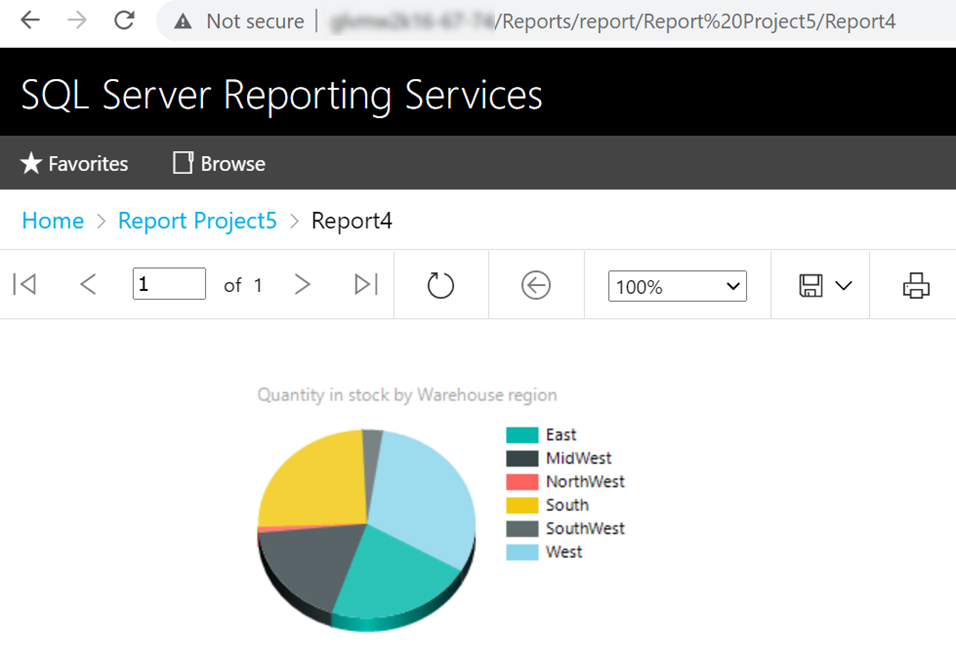
Navigate to Home > Report Project5. In this example, 4 reports were built under the SSRS project Report Project5.
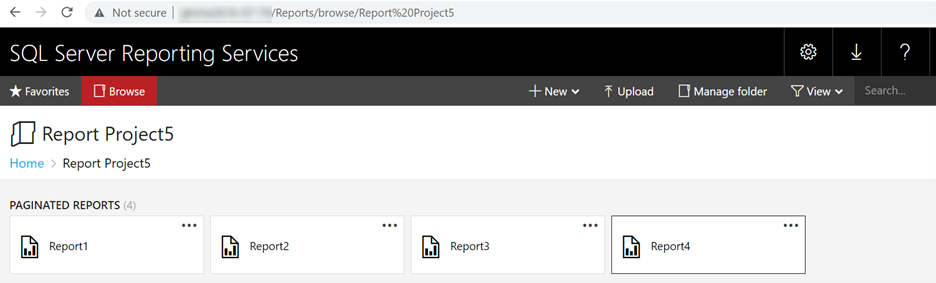
Click the report you want to display from the SSRS project. In this example we display Report4.
Known Limitations
SSRS connections to Vertica work only with ADO.NET and ODBC. OLEDB is not supported.
Data Type Incompatibility with ADO.NET
- CHAR data type is supported up to a length of 32000 above which the following error is displayed:
H RESULT E_FAIL has been returned from a call to COM Component
- For LONG VARCHAR data type, the maximum size displayed is limited by the system resources. You may see an exception "System.OutOfMemoryException” with very large values.
- NUMERIC data type supports up to 28 digits of precision beyond which the scale is rounded off. If a number exceeds 28 digits to the left of the decimal point the error "rsErrorReadingDataSetField" is displayed.
- For TIME, TIMETZ, TIMESTAMP, and TIMESTAMPTZ data types, milliseconds are truncated.
- INTERVAL YEAR TO MONTH data type is not supported.
- BINARY, VARBINARY, and LONG VARBINARY data types are not supported in SSRS and the following error is displayed:
[rsInvalidExpressionDataType] The Value expression used in textrun ‘<ColumnName>.Paragraphs[0].TextRuns[0]’ returned a data type that is not valid
Data Type Incompatibility with ODBC
-
CHAR data type is supported up to a length of 32000 above which the following error is displayed:
H RESULT E_FAIL has been returned from a call to COM Component
-
INTERVAL data type is not supported and the following error is displayed:
System.ArgumentException: Unknown SQL type – 112
-
For LONG VARCHAR data type, the maximum size displayed is limited by the system resources. You may see an exception "System.OutOfMemoryException” with very large values.
-
NUMERIC data types supports up to 28 digits of precision beyond which the scale is rounded off. If a number exceeds 28 digits to the left of the decimal point the error "rsErrorReadingDataSetField" is displayed.
- For TIMETZ and TIMESTAMPTZ data types, milliseconds and timezone are truncated.
-
For TIME and TIMESTAMP data type, milliseconds are truncated.
-
BINARY, VARBINARY, and LONG VARBINARY data types are not supported and the following error is displayed:
[rsInvalidExpressionDataType] The Value expression used in textrun ‘<ColumnName>.Paragraphs[0].TextRuns[0]’ returned a data type that is not valid.

