
I will ya in
Vertica Integration with DBeaver: Tips and Techniques
About Vertica Tips and Techniques
Vertica Tips and Techniques documents provide information to assist you in using Vertica with third-party products. This document provides guidance using one version of Vertica and one version of the vendor's software. While other combinations may feature the same or similar behavior, they may not have been tested.
Vertica and DBeaver Versions Tested
This document is based on our testing of Vertica and DBeaver using the following versions:
| Software | Version |
|---|---|
| Partner Product |
DBeaver 23.1.3 |
| Desktop Platform |
Windows Server 2019 |
| Vertica Client |
Vertica JDBC driver 23.3.0 |
| Vertica Server |
Vertica Server 23.3.0 |
DBeaver Overview
DBeaver is a free and open-source SQL client and database management tool. DBeaver runs on Windows, MacOS, and Linux platforms and supports most databases. You can write your own extensions to DBeaver.
Connecting Vertica to DBeaver
DBeaver uses the Vertica JDBC driver to connect to Vertica. To install the driver on Windows, follow the instructions in Installing the JDBC Client Driver for Windows in the Vertica documentation. For additional information, see Connecting to Vertica.
For more information about the integration, see Vertica Integration with DBeaver: Connection Guide.
Tips for Using DBeaver with Vertica
The following topics include information to assist you in using DBeaver with Vertica:
- Editing Driver Properties
- Using Native Connection Load Balancing
- Using Client-Side Logging
- Using Entity Relationship Diagrams
- Using SSL Security
- Using Query Manager
- Exporting and Importing Tables
- Using Stored Procedures
- Using Query Plan Execution
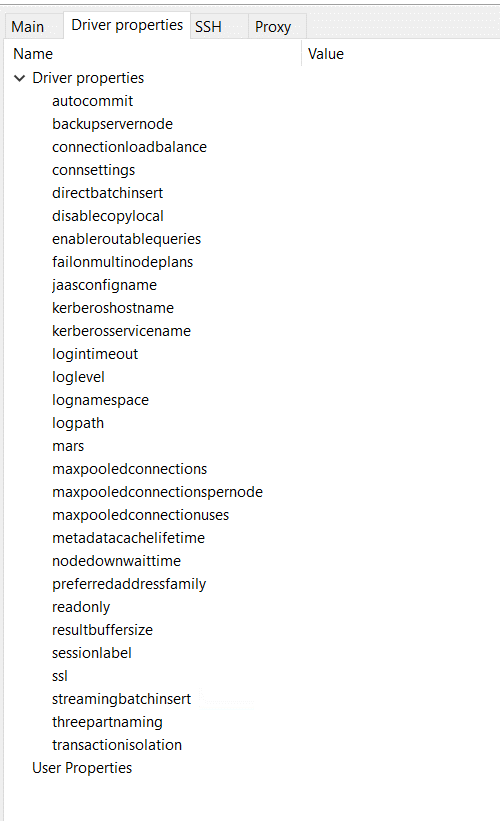
Editing Driver Properties
You can modify Vertica driver properties from DBeaver.
To access the Vertica driver properties:
- On the main menu of DBeaver, locate Database Navigator.
- Right-click the Vertica database connection and click Edit Connection.
- Under Connection settings, select Driver properties.
For details about JDBC connection properties in Vertica, see the Vertica documentation.
Using Native Connection Load Balancing
Native connection load balancing is a feature built into the Vertica server and client libraries. It helps to evenly distribute the resource demands of client connections across the hosts in a cluster. Connection load balancing requires configuration on the server and on the client.
Server Configuration
You can set load balancing to one of the following:
- NONE: Disables load balancing. (Default)
- ROUNDROBIN: Chooses the next host from a circular list.
- RANDOM: Chooses the next host at random.
The following query checks if load balancing is in effect:
SELECT LOAD_BALANCE_POLICY FROM V_CATALOG.DATABASES;
The following statement sets load balancing to ROUNDROBIN:
SELECT SET_LOAD_BALANCE_POLICY('ROUNDROBIN');
For details about server configuration for connection load balancing, see the Vertica documentation.
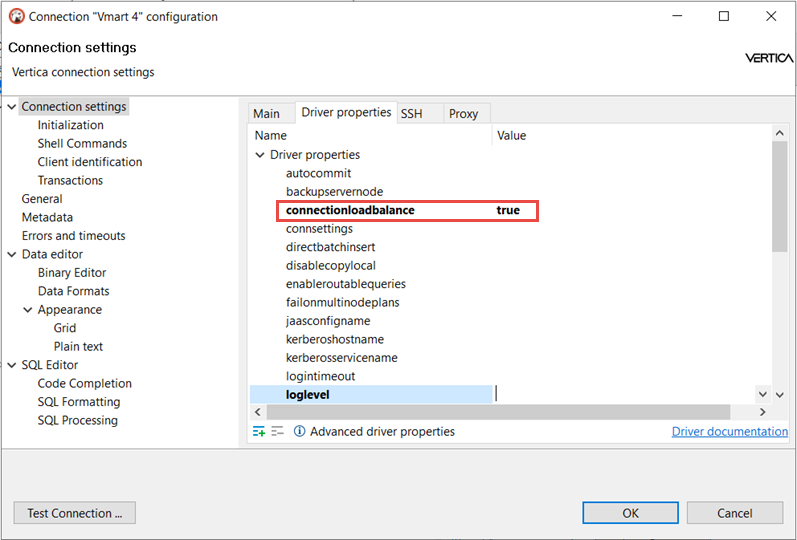
Client Configuration
- In DBeaver, open the Driver properties page for your Vertica connection.
- Select Driver properties.
- Set connectionloadbalance to true.
For details about native connection load balancing, see the Vertica documentation.
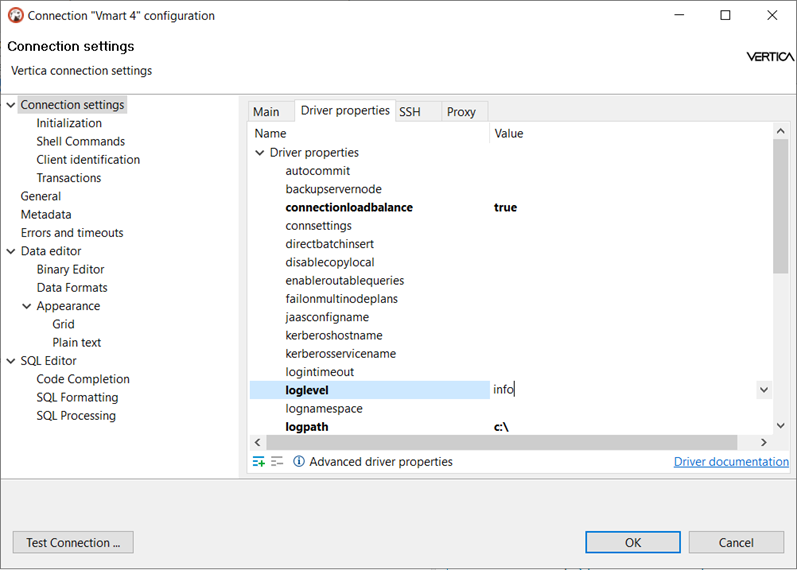
Using Client-Side Logging
You can enable logging in DBeaver by setting the log path and log level in the driver properties. With logging, you can debug or trace connectivity details or issues. The log path and log level settings are defined as follows:
- Log Path: Sets the path where the log file is written.
- Log Level: Sets the kind of information logged by the JDBC driver. The log level values are:
Debug,Error,Trace,Warning,Info, andOff.
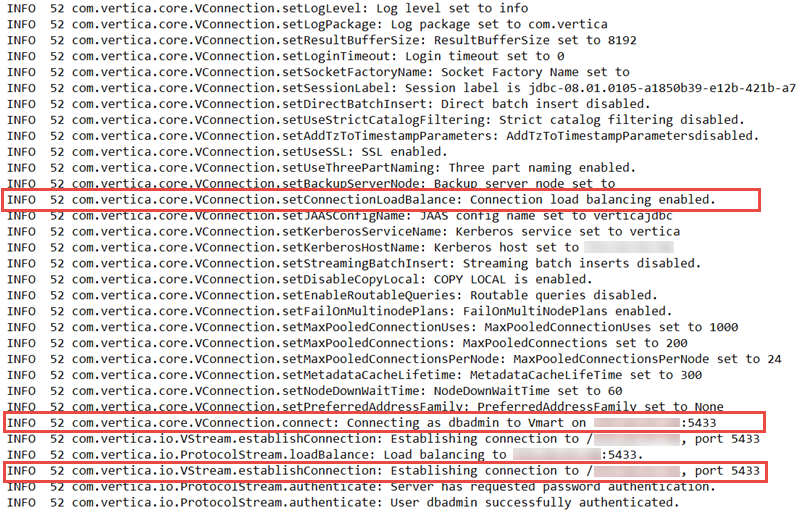
In the following example, the log level is set to info and the path is set to C:\, causing information about load balancing for this connection to be written to a log file directly under C:\.
In the following log file, you can see the JDBC properties and verify that load balancing is enabled. You can debug client issues by examining other entries in the log file.
Using Routable Queries
The JDBC Routable Query API is ideal for high-volume, short requests that return a small number of results on a single node. The Routable Query API provides lower latency, increases throughput, and uses fewer system resources than distributed queries. However, you must segment the data so that the JDBC client can determine on which node the data resides.
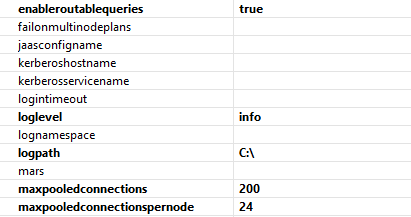
For example, the following driver settings enable routable queries, setting maxpooledconnections to 200 and maxpooledconnectionspernode to 24:
You can check the logs to verify that routable queries were in effect and evaluate the increase in throughput:

For more information about routable queries, see JDBC Routable Query API: Best Practices.
Using Session Labels to Track Queries
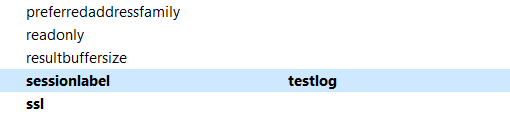
The sessionlabel driver property lets you track the queries in the labeled session. In the following example, sessionlabel is set to testlog:
With sessionlabel set to testlog, the following query returns results as in the following sample output :
SELECT * FROM SESSIONS WHERE client_label = 'testlog';

Using Entity Relationship Diagrams
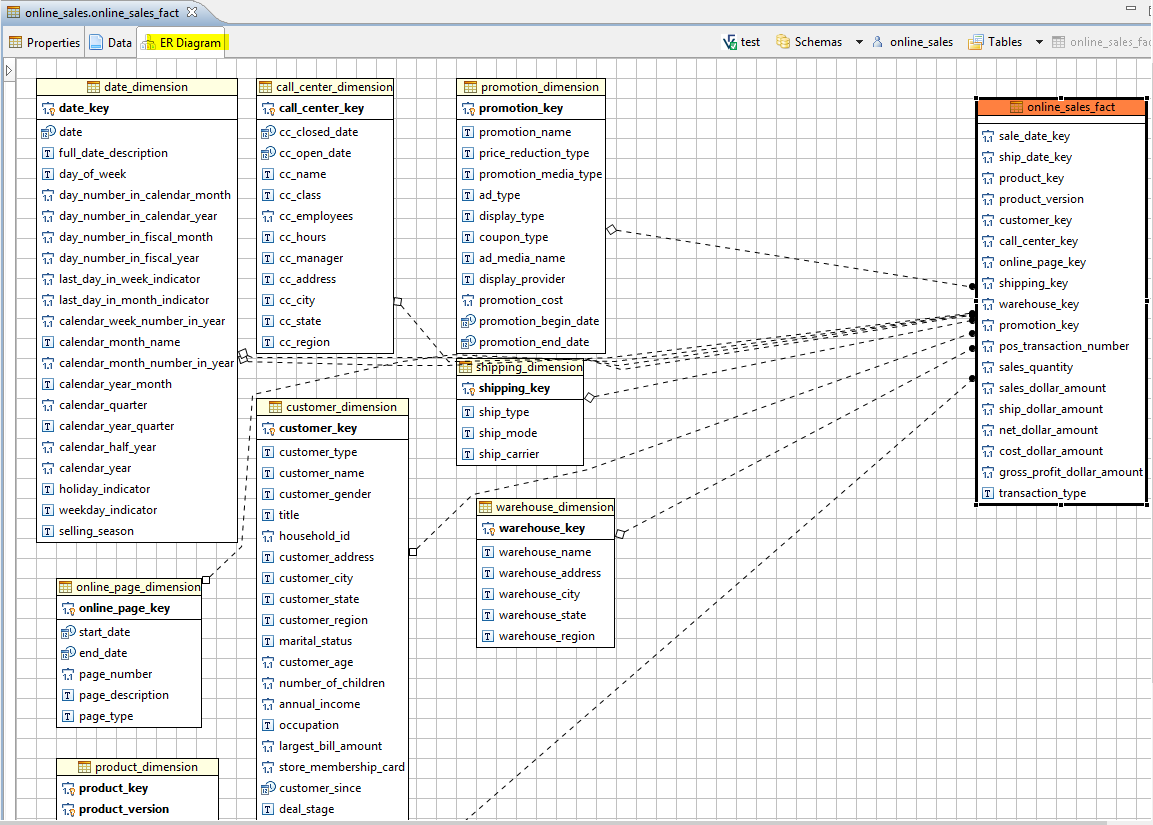
The DBeaver UI includes an option for viewing your data as an Entity Relationship (ER) diagram. ER diagrams offer a visual representation of the business rules that govern the relationships between tables. Use ER diagrams to gain a better understanding of the structure of your data.
The following ER diagram shows the relationships between a fact table and its dimensions in the Vertica VMart database.
Using SSL Security
Vertica supports Secure Socket Layer (SSL) v3/Transport Layer Security (TLS) 1.2. SSL/TLS provides secure connections and protects the privacy and integrity of the data exchanged between Vertica and its clients by sending the data in encrypted form instead of sending plain text.
Configuring SSL in Vertica
- In the Linux command line, execute the following:
Generate the server.key.
          $ openssl genrsa -out server.key
      Generate a certificate signing request.
          $ openssl req -new -nodes -key ./server.key -out ./server.csr
Specify the following:
- Country Name: A 2-letter code. For example,
GBorUS. - State or Province Name: The full state or province name. For example,
BerkshireorMassachusetts. - Locality Name: The city. For example,
NewburyorBoston. - Organization Name: The company name. For example,
MyCompany_LtdorVertica - Organizational Unit Name: The section within the company. For example,
Support_server. - Common Name: Your name or your server host name. For example,
MyHost. - Email Address: For example,
myhost@vertica.com Enter the following 'extra' attributes to be sent with your certificate request:
A Challenge Password: The Password.For example, Server_key_password
An Optional Company Name: The optional Company name, for example, My optional
- Country Name: A 2-letter code. For example,
- Generate a self-signed certificate valid for 365 days:
openssl x509 -req -days 365 -in ./server.csr -signkey ./server.key -out ./server.crt
- Use root.crt/root.key to create user certificates. For the self-signed certificates, the root.crt is the same as the server.crt.
$ cp ./server.crt ./root.crt $ cp ./server.key ./root.key - Now your keys and certificates are all set. Time to put them in DB. Ensure that DB is created and running. Execute following command using admintools:
$ /opt/vertica/bin/admintools -t set_ssl_params -d <dbname> -p <password> -k ./server.key -c ./server.crt -a ./root.crt
-
Enable SSL:
Echo "ALTER TLS CONFIGURATION server TLSMODE 'ENABLE';" | vsql
- Restart the database.
- Start vsql again. You should see a message like the following before the vsql prompt appears:
SSL connection (cipher: ECDHE-RSA-AES256-GCM-SHA384, bits: 256, protocol: TLSv1.2)
For more information, see TLS Overview in the Vertica documentation.
Enabling SSL in DBeaver
- At the Linux command line on the Vertica server, execute the following:
> openssl x509 -in server.crt -out server.crt.der -outform der
This command converts the Vertica server certificate to a form that can be recognized by Java.
- Copy server.crt.der to the DBeaver client machine and execute the following command:
> Keytool.exe -keystore verticassl -keypasswd -storepass test123 -importkeystore -noprompt -alias verticasql -import -file server.crt.der
You can find keytool.exe in C:\Program Files\Java\jdk1.8.0_71\bin
- Execute the following command to start DBeaver:
> dbeaver -vmargs -Djavax.net.ssl.trustStore="C:\Program Files\Java\jdk1.8.0_71\bin\verticassl" -Djavax.net.ssl.trustStorePassword=test123 Setssl
- In the DBeaver driver properties, set ssl to true.
You can verify that SSL has been enabled by checking the JDBC logs. For example:

For details about SSL in Vertica, see the Vertica documentation.
Using Query Manager
DBeaver logs all queries that have been executed in the session in its Query Manager.
To open the Query Manager, select Window > Show View from the DBeaver main menu.
The information presented within the Query Manager is shown in the following example:

Note DBeaver Enterprise Edition persists all executed queries in the internal database, so execution history is available after program restart.
Exporting and Importing Tables
DBeaver supports import and export across database connections and importing from and exporting to different file formats.
To import and export data across database connections, use this option in DBeaver:
Database= Database table(s)
Follow these steps to export data from one database connection to another:
- In the main menu of DBeaver, select a table from one of the available database connections.
- Click Export Data.
In this example, online_sales.call_center_dimenion is selected for export.
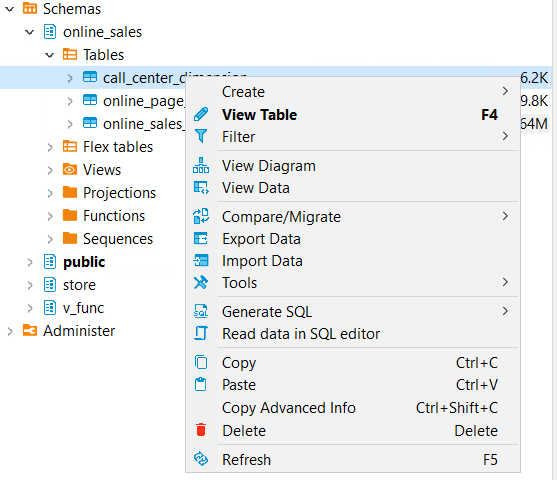
- In the Data Transfer dialog box, select Database to indicate export to a different database, and Database table(s) to indicate that the export target is one or more tables in that database.
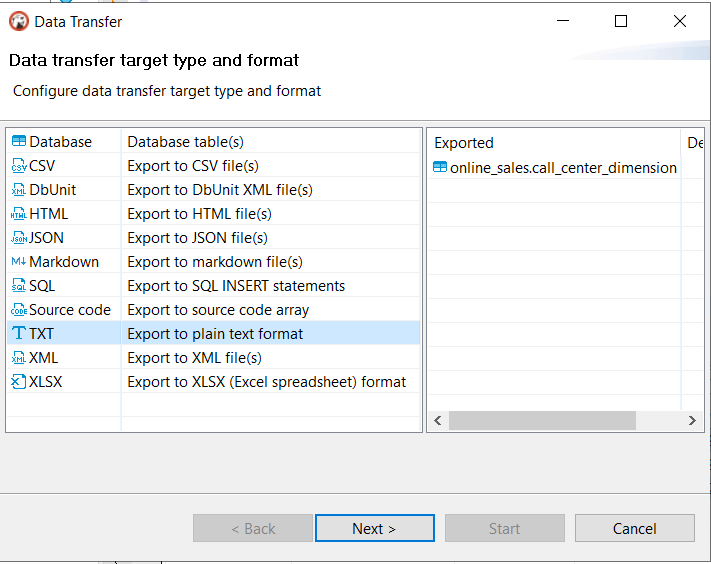
- Click Next.
- Check the source and target. You can add the specified location in the target.
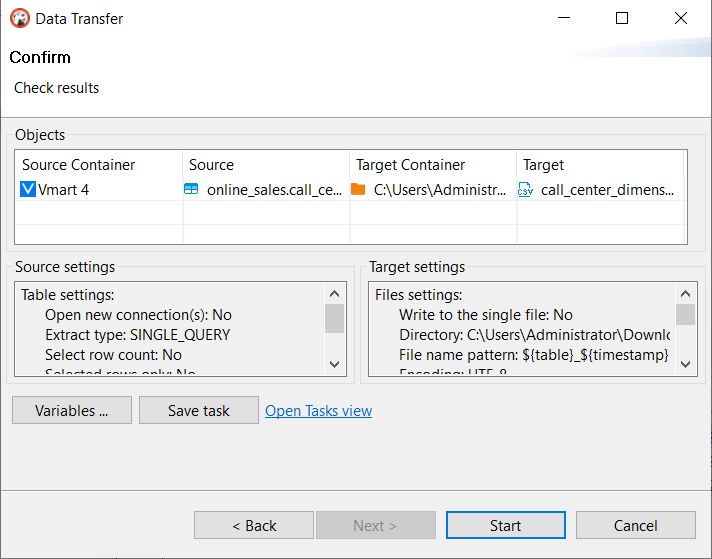
- Click Start to export the data.
- Check the target location for the exported file.
Note Exporting a very large amount of data may cause a Java heap space error in DBeaver. If this error occurs, restart DBeaver with
-vmargs-Xms500mfrom the command prompt. Depending on the export requirement, increase the memory.
Using Stored Procedures
You can now view stored procedures for Vertica in DBeaver. Stored Procedures are in the Procedures folder in DBeaver. You can create and call the stored procedures from DBeaver.
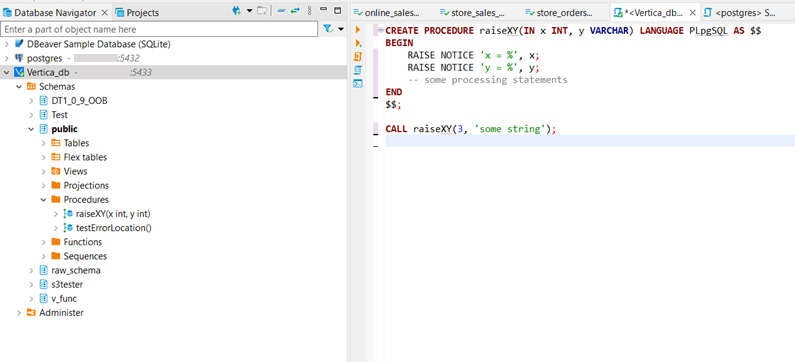
You can export the procedure into DDL Command.
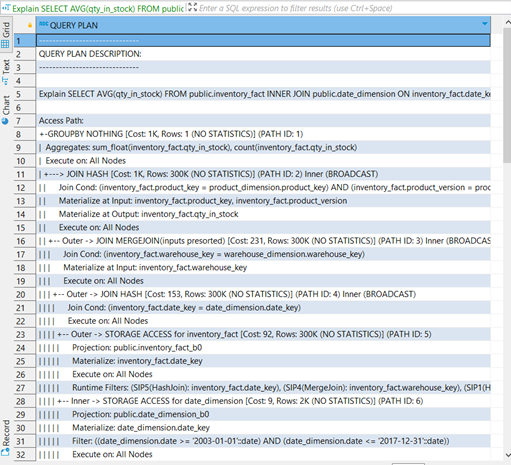
Using Query Plan Execution
You can use DBeaver to show the explain plan query:
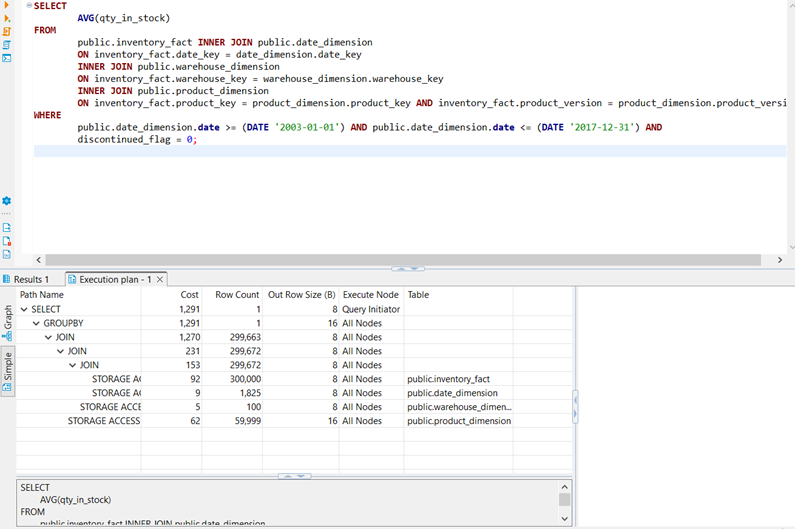
It has a graphical view as well:
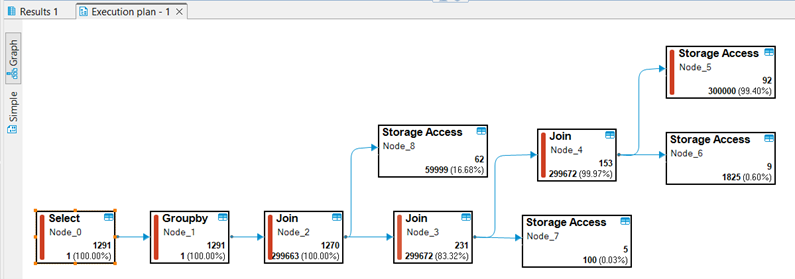
You can also view the query execution plan using the explain query command: